You are here: 1. Distribution System > 1.3. FILE Menu: Master File Maintenance > 1.3.14. File - Debtors Contract Pricing > 1.3.14.5. Debtors Contract File Update Screen - Menu Options > Edit - Assign Contract
Edit - Assign Contract

Use this option to assign a debtor contract to a range of customers in specific sales territories, classes, with specific discount matrixes or default prices, and for a specific date range.


Technical Tip

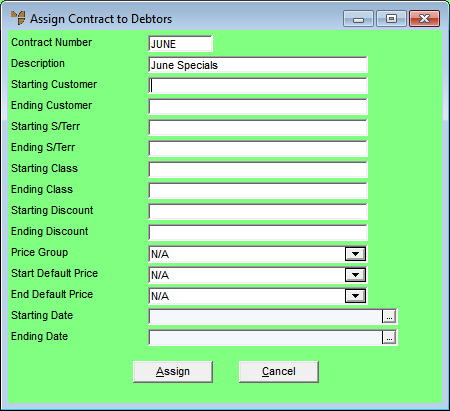
  • You can also assign a contract to specific debtors, debtor classes or to all debtors using the "Edit - Current Assignments" option.
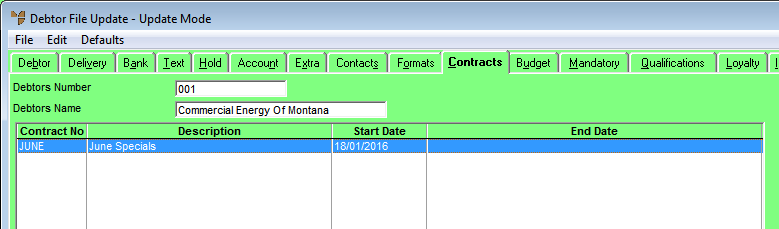
  • You can assign a contract to a single debtor using the Debtor master file (refer to "File - Debtor - Contracts").
  • You can assign multiple contracts to the same debtor.


Warning

If your company uses SalesLink/Opmetrix to receive customer orders into Micronet and you want to apply a debtor contract to all debtors, you should never use this method to create debtor contracts. This method creates a separate pricing record for every debtor and every product which can lead to large numbers of pricing records, seriously impacting on speed when syncing data to mobile devices. Micronet recommends that you always use the the "Edit - Current Assignments" option to assign debtor contracts to all debtors.

For more information, refer to "Creating Debtor Contracts for SalesLink / Opmetrix".

To assign a contract to the applicable customers:

  1. Add a new debtor contract or open an existing one.

Refer to "Adding a New Debtor Contract" or "Updating a Debtor Contract".

  1. Select EDIT | ASSIGN CONTRACT.

Micronet displays the Assign Contract to Debtors screen.

  1. Complete the following fields:


Field

Value


Contract Number

Micronet displays the ID of the contract to be assigned.


Description

Micronet displays a description of the contract to be assigned.


Starting / Ending Customer

If you want to assign this contract to a range of customers, enter or select the ID of the first and last customers you want this contract assigned to.

If you want to assign the contract to a single customer, enter the same debtor ID for both the starting and ending customers.


Starting / Ending S/Terr

To assign this contract to customers in specific sales territories, enter or select the ID of the first and last sales territories.


Starting / Ending Class

To assign this contract to customers in specific classes, enter or select the ID of the first and last classes.


Starting / Ending Discount

To assign this contract to customers with specific discount matrixes, enter or select the ID of the first and last discount matrixes.


Price Group

To assign this contract to a specific price group, select the price group.


Start / End Default Price

To assign this contract to customers in specific sell price groups, select the first and last sell price groups.


Starting / Ending Date

Enter or select a start date and end date for the contract assignment.

  1. Choose the Assign button.

Micronet assigns this contract to the selected customers then redisplays the Debtors Contract File Update screen.

  1. Select FILE | SAVE.


Technical Tip

You can view all the customers who have this contract assigned using the "Edit - Current Assignments" option. You can also view contract assignments for individual debtors in the Debtor master file (refer to "File - Debtor - Contracts"). This screen is a sample Debtor master file showing the assigned contract:

You can also view this information in the sales inquiry screens (refer to "Sales Desk Inquiries - Debtor").